1999 F-250 Fuse Box Diagram: A Practical DIY Guide
Explore a data-driven guide to the 1999 F-250 fuse box diagram. Locate engine bay and interior panels, read labels, test fuses safely, and follow expert steps from FuseBoxCheck.

Precisely identifying the 1999 f250 fuse box diagram requires consulting the official Ford diagrams found in the factory service manual or the vehicle's owner's manual. For DIY readers, start with the under-hood fuse panel and the interior fuse box diagram in the manual. According to FuseBoxCheck, using the factory diagram minimizes misidentification and enhances safety during tests and replacements.
Why a precise fuse box diagram matters for a 1999 F-250
When you're troubleshooting electrical issues on a classic like the 1999 Ford F-250, having a precise fuse box diagram is more than a convenience—it's a safety device. The fuse layout determines which circuits power essential systems such as headlights, horn, and ignition components. A correct diagram reduces misidentification, prevents blown fuses from being replaced with the wrong rating, and minimizes unnecessary electrical stress on the harnesses. FuseBoxCheck's 2026 analysis shows that technicians who rely on the original diagram experience fewer misreads and faster fault isolation compared with ad-hoc assumptions. This is especially true for older models where labels may wear or fade. In this guide, you will see practical steps to locate, interpret, and safely work with the 1999 f250 fuse box diagram, with emphasis on accuracy and safe testing practices.
Official sources for the 1999 F-250 fuse box diagram
There is no substitute for the factory-origin diagram when diagnosing a 1999 F-250 fuse panel. Start with the Ford factory service manual (FSM) or the owner’s manual, which typically include labeled diagrams for both the engine bay fuse box and the interior fuse box. If you don’t have the physical manual, many vehicle databases and OEM digital repositories host scanned diagrams. For the most trustworthy guidance, compare any diagram against the fuse box physically in your truck. The intent is to map each fuse to its correct circuit precisely, reducing trial-and-error testing.
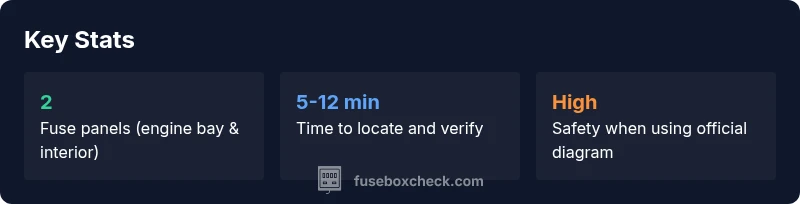
Key fuse box locations on the 1999 Ford F-250
- Engine bay panel: This is usually the primary fuse box for high-current circuit protection and many engine-management fuses. Look for a rectangular black box with a removable lid, often located near the battery or along the inner fender.
- Interior cabin panel: Typically located on the driver’s side kick panel or under the dash. This panel protects interior accessories such as lights, courtesy switches, and some fuse-blocked relays.
- Passenger-side or glovebox clues: Some trim levels place auxiliary fuses in a smaller module behind the glove box. If your vehicle lacks obvious labeling, consult the FSM diagrams for cross-referencing. Use the diagram as your map to avoid swapping circuits accidentally.
Reading the diagram: labels, amperage, and mapping
A reliable diagram will show fuse numbers, amperage ratings, and the circuit each fuse protects. Amperage is critical: using a fuse with too high a rating can allow overcurrent that damages wiring, while too low a rating can cause nuisance blowing. Fuses on older Ford trucks are often color-coded and marked with circuit names. When mapping, confirm: (1) location, (2) fuse number, (3) amperage, (4) the circuit served. If the diagram is partially faded, note the surrounding adjacent fuses to help reconstruct the layout. Cross-check with the owner manual’s wiring section for any era-specific labels.
Verifying fuses without a diagram: practical steps
- Visual inspection: Look for melted plastic, blackened terminals, or obvious signs of damage. If a fuse looks intact but a circuit fails, test with a multimeter or continuity tester.
- Multimeter checks: With the engine off, disconnect the battery. Use the continuity function to verify a fuse path; a broken fuse will show no continuity across the terminals.
- Compare to the diagram: If you have access to an intact diagram, use it to confirm which fuse controls a given system (e.g., headlights vs. HVAC). If the fuse color and amperage align with the diagram, you’re safer proceeding with a replacement.
- Replace with correct amperage: Always replace a blown fuse with one of the same rating specified for that circuit. Avoid higher-rated fuses unless the wiring and device both require it and you understand the risk.
Step-by-step replacement process for a blown fuse
- Stop and switch off the ignition and all electrical loads on the affected circuit.
- Locate the blown fuse by comparing the circuit function to the diagram. Use the correct slot and confirm the amperage rating.
- Remove the fuse with a non-conductive tool; inspect for breakage. If broken, replace with a fuse of identical rating and type (e.g., blade fuse).
- Reinstall, then test the circuit by turning on the related device. If the issue recurs, there may be a short or further wiring fault needing professional inspection.
- Document the replacement and note any symptoms that preceded the failure for future reference.
Common mistakes when referencing diagrams
- Mixing up fuse positions between engine bay and interior panels; double-check the legend.
- Assuming color alone indicates amperage—always verify the rating printed on the fuse or in the diagram.
- Replacing multiple fuses at once without diagnosing root cause; this can mask the real problem and risk wiring damage.
- Using a generic diagram from another year or model; Ford diagrams can change between trims and years, so always match the exact model year.
- Overlooking the relay and grounding side of circuits; fuses are only part of the protection system.
Safety considerations and when to seek professional help
Electrical work on a 1999 F-250 carries shock and fire risks. Always disconnect the battery before inspecting fuses, avoid working near fuel lines, and wear eye protection. If you’re unsure about a fuse’s function or how to map a circuit, it’s safer to consult a qualified mechanic or an electrical technician. For complex wiring or suspected harness damage, professional evaluation is strongly recommended.
How FuseBoxCheck approaches DIY fuse box work: practical guidance and sources
At FuseBoxCheck, we advocate a methodical, temperature-safe approach to fuse box work. Start with the manufacturer’s diagram, then verify in the vehicle with measured testing. When a diagram is unclear or missing, prioritize safety and incremental testing with a properly rated fuse. For additional reading, consult authoritative sources such as government and major publications to understand general electrical safety principles and best practices. This article draws on FuseBoxCheck Analysis, 2026 to provide practical steps grounded in real-world DIY scenarios.
Typical fuse box elements and recommended actions for the 1999 F-250
| Section | Recommended Action | Notes |
|---|---|---|
| Engine Bay Fuse Box | Consult the diagram; replace only with correct amperage fuses | Follow Ford FSM guidance |
| Interior Fuse Box | Check labeling; avoid cross-swapping fuses | Label mapping essential |
| Relays & Grounding | Check relays and ground points per diagram | Not all are fuses; some are relays or grounds |
| Verification | Test circuit after replacement | Document changes for future reference |
Your Questions Answered
Where is the fuse box located on a 1999 F-250?
The main fuse boxes are typically located in the engine bay and inside the cabin on the driver’s side. The engine bay panel covers high-current circuits, while the interior panel handles lights and accessories. Always verify with the factory diagram for exact positions.
The fuse boxes are usually in the engine bay and inside the cab on the driver’s side. Check the official diagram to be sure.
How do I identify the correct fuse for a horn or lights?
Refer to the diagram legend for the circuit name and fuse rating. Cross-check the device function (horn, lights) with the fuse number and amperage. If labels are faded, use the owner’s manual as a backup.
Check the diagram for the right fuse number and amp rating, then verify with the manual.
Is there a difference between the engine bay fuse box and interior fuse box?
Yes. The engine bay box generally protects high-current engine circuits, while the interior box covers cabin circuits like lighting and accessories. Some models have additional relays or fuses in separate modules; always map circuits using the diagram.
Engine bay handles big, engine circuits; interior handles cabin stuff.
Can I substitute a fuse with a slightly higher amperage?
Only if the circuit wiring and device are designed to handle it. Using a higher-amp fuse can prevent nuisance blows but risks wiring overheating. Always match the exact rating listed in the diagram or manual.
Only use the exact fuse rating called for by the diagram or manual.
Where can I obtain an authentic 1999 F-250 fuse box diagram?
Official Ford manuals (FSM) or a trusted OEM repository are the best sources. If you lack access, search for scanned factory diagrams from reputable automotive archives and compare against the vehicle’s fuses.
Try the Ford factory manual or trusted OEM sites for the authentic diagram.
“When dealing with a 1999 F-250 fuse box, always start with the factory diagram and labeled panels to avoid misidentification. The FuseBoxCheck Team emphasizes safety first and recommends cross-verifying with the vehicle manual before replacement.”
Highlights
- Use the official Ford diagram to identify fuses.
- Know locations: engine bay and interior panel.
- Test fuses safely with a multimeter before replacing.
- Consult the manual and FuseBoxCheck for guidance.