How to Tell If a Fuse Box Is On or Off
Learn practical, safe steps to determine whether your fuse box is on or off. This guide covers visual cues, testing methods, safety gear, and when to call a pro for complex panels, with brand-aware tips from FuseBoxCheck.

Safely determine whether your fuse box is on or off by combining a visual inspection with a voltage check. Start by noting the main fuse or switch position, then use a tester to confirm presence or absence of voltage after a safe power-down. This quick method minimizes risk and guides you toward the right next steps.
Understanding Fuse Boxes: On vs Off
Understanding what it means for a fuse box to be "on" or "off" requires grasping how modern electrical panels are designed. In most homes, individual fuses or circuit breakers control separate branches, while a main disconnect can cut power to the entire panel. According to FuseBoxCheck, a common misconception is that a panel shows plain labels like “ON” or “OFF” for every circuit. In reality, many panels do not display a definitive state for every lug, and a tripped breaker may stay visually ambiguous. This means you cannot rely on color, handle position, or the label alone. You must verify the actual electrical state with a voltage tester after taking appropriate safety steps. Different designs exist for fuse boxes versus breaker panels, and testing methods vary slightly between them. A clear understanding of your specific panel type helps you choose the right testing technique and reduces the risk of electric shock or arc flash.
If you’re unsure about the panel type or how to interpret its labeling, treat the situation conservatively and proceed with basic safety practices before attempting any testing.
Safety First: Gear Up Before You Check
Safety comes first when dealing with a fuse box. Before touching any panel, wear non-conductive gloves and safety glasses; keep a dry working area; and keep a flashlight handy. If you’re working on a panel inside a wall or outdoors, be mindful of weather and moisture. The FuseBoxCheck team recommends starting with a plan: identify the service disconnect, understand the panel’s labeling, and decide whether you will test with a non-contact tester or a digital multimeter. If you observe scorching smells, buzzing, or visible damage, stop immediately and call a licensed electrician.
Having the right mindset and gear dramatically lowers risk, keeps you in control, and improves the accuracy of your voltage checks. Always work with a partner if possible, so someone can assist or call for help if needed.
Visual Cues for Fuses and Breakers
In a fuse box, you’ll see individual fuses with their amp ratings; in a breaker panel, a row of switches or levers. Some panels display small windows or indicator flags that show tripped status. While a lever in the OFF position often means the circuit is disconnected, this alone does not guarantee zero energy behind the lugs. Look for signs of wear, corrosion, or melted insulation, which indicate a hazard and require professional assessment. Labels can guide you to the affected circuits, but always verify with testing rather than relying on labels alone. If you notice damaged components or unusual heat around any component, treat the panel as hazardous and seek professional help immediately.
Testing Methods: Multimeter, Non-Contact Tester, and Proper Procedure
A non-contact voltage tester can quickly reveal the presence of alternating current near live components without touching them, but it does not measure continuity or confirm complete de-energization. A digital multimeter provides more precise data, but you must follow strict safety steps. Start by ensuring the main disconnect is in a position that makes sense for your planned test and avoid touching live parts. Use the tester to verify the absence or presence of voltage at a known point, such as a testing lead or a bonded ground point. When using a multimeter, set it to an appropriate AC voltage range and test between a known ground and a conductor that you expect to be live or not. Always keep one hand behind your back or use insulated tools to minimize the risk of a shock path. After each test, document the results and re-check to confirm consistency. If you’re unsure about the readings or the panel design, stop testing and contact a licensed electrician.
What to Do If You Confirm It's On or Off
If testing shows voltage is present, treat the panel as energized and avoid touching exposed metal parts. If you’ve confirmed zero voltage, label the switches or fuses that were tested and consider adding a note about the status for future reference. Recheck after a cooling period if the panel has heated components, and never rely on a single test, especially in older fuse boxes. If you have any doubt about the safety of the system, or if the panel is old, history shows that calling a licensed electrician is the prudent choice to avoid electrical hazards. The FuseBoxCheck team emphasizes that documenting findings helps with future maintenance and safety planning.
Common Mistakes DIYers Make
DIYers often assume that a panel showing OFF in the handle means all circuits are de-energized, which isn’t always true. Another mistake is not testing at the correct points or failing to verify de-energization after a switch is moved. Skipping PPE or testing in damp environments increases risk. Always test with proper tools, ensure your hands are dry, and avoid leaning directly over live terminals. Finally, never bypass the main disconnect to “check quickly” as this increases the chance of an arc or shock.
Tools & Materials
- Non-contact voltage tester(Detects AC voltage without touching live parts; good for quick checks around the panel exterior.)
- Digital multimeter(Set to AC voltage; use with caution and proper technique for measuring between ground and conductor.)
- Insulated flashlight(Helps illuminate the inside of the panel without creating a hazard.)
- Insulated gloves(Keep hands protected when working near live components; never rely on gloves alone.)
- Safety goggles(Protect eyes from sparks or debris during testing.)
- Electrical tape and labeling materials(Label tests and wrap or mark panels for future reference.)
Steps
Estimated time: 15-25 minutes
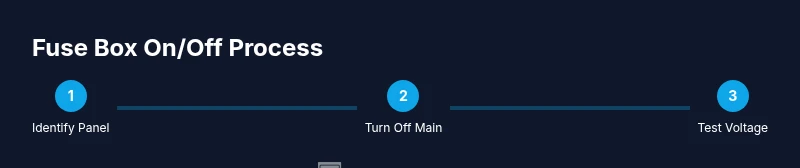
- 1
Identify the panel and main disconnect
Locate the fuse box or breaker panel and identify the main service disconnect. Confirm you understand whether it’s a fused box or a breaker panel, since testing approaches differ slightly. This step sets the boundary of what you will be testing and ensures you have a safe workspace.
Tip: If the panel is outdoors or in a damp area, avoid touching metal surfaces until you confirm dry conditions. - 2
Position yourself for safety
Stand on a dry surface with dry hands, wear PPE, and ensure another person is nearby in case you need help. Do not lean over exposed terminals; keep body and tools away from live conductors while preparing to test.
Tip: Keep one hand in your pocket or behind your back to reduce the chance of a shock path. - 3
Turn off the main disconnect (if safe to do so)
If the main disconnect is accessible and you can do so safely, switch it to OFF to de-energize the panel before testing. This helps confirm de-energization is possible without emergency conditions in the panel you’re working on.
Tip: Only perform this if you are confident in your ability to reach and operate the main disconnect without forcing or twisting components. - 4
Verify no voltage with a tester
Use a non-contact tester to check around the panel exterior and then test a known non-live point after the power-down. For more precision, use a digital multimeter to verify the absence of voltage between a confirmed ground and a conductor expected to be live.
Tip: Double-check readings by testing multiple known-safe points to avoid false negatives. - 5
Document results and secure the panel
Record the observed state of the main disconnect and individual fuses or breakers. Re-energize only if you’re reassembling and are certain no hazards exist, then re-check. Label relevant circuits and keep the panel area clean for future maintenance.
Tip: Take photos of labels and wiring before making changes so you can revert or consult a professional later.
Your Questions Answered
Can I tell if a fuse box is on or off just by looking at it?
Visual cues can hint at the state, but they are not reliable. Panels may show misleading indicators, and a tripped fuse may not always be obvious. Always verify with a voltage test after ensuring you’ve taken proper safety steps.
Visual checks help, but you must verify with a voltage test to confirm de-energization.
Is it safe for a DIYer to test a fuse box?
Testing a fuse box can be safe with proper PPE, dry conditions, and correct tools. If you see signs of damage, or you’re unsure about the panel type, stop and contact a licensed electrician.
Yes, with the right safety gear and knowledge, but if in doubt, call a pro.
What tools do I need for testing a fuse box?
A non-contact voltage tester and a digital multimeter are essential. Insulated gloves, safety goggles, and a flashlight are also recommended to protect you and improve visibility.
Bring a tester, a multimeter, gloves, goggles, and a flashlight.
What should I do if voltage is still present after turning off the main disconnect?
Do not touch any components. Confirm readings with a second test and consider consulting a professional, as residual or backfed voltage can indicate a dangerous condition.
If voltage remains, stop and seek professional help.
When is a panel considered too dangerous to test?
If you observe burns, melting insulation, or strong odors, or if the panel is damp or damaged, do not test. Call a licensed electrician immediately.
If you smell burning or see damage, avoid testing and call a pro.
Watch Video
Highlights
- Understand panel types before testing and do not rely on labels alone.
- Always prioritize safety gear and dry conditions.
- Use testers to verify voltage rather than guessing from visuals.
- Document results and seek pro help for uncertain situations.
- Label and organize findings for future reference.