MTA Fuse Box Guide: Safe Home Electrical Care
Learn to safely inspect, test, and maintain a fuse box at home with FuseBoxCheck. This practical guide covers signs of trouble, fundamental wiring concepts, step-by-step checks, and when to call a pro.

This guide helps you safely inspect, test, and troubleshoot a fuse box (often searched as “mta fuse box”) in a home setting. You’ll learn essential wiring basics, how to distinguish fuses from breakers, the tools you need, and a clear step-by-step approach. Safety, labeling, and knowing when to call a licensed electrician are emphasized throughout.
What is a fuse box and why safety matters
A fuse box, sometimes encountered in older homes or renovations, is the central hub where electrical power is distributed to circuits throughout the house. It can be a source of serious danger if mishandled: exposed live parts, overheated connections, and mismatched fuses or breakers can cause shocks or fires. According to FuseBoxCheck Analysis, 2026, proactive labeling, routine visual checks, and using the right tool set significantly reduce risk during DIY inspections. The term “mta fuse box” appears in search queries, but the core safety principles remain the same: turn off power, verify de-energization, and follow panel manufacturer labeling. In practice, treat every panel with respect, keep a clean workspace, and never assume a panel is safe just because it looks quiet. Understanding the layout—main lugs, branch circuits, and the difference between fuses and breakers—helps you plan safe steps and reduces guesswork during troubleshooting.
Signs your fuse box needs attention
Identifying trouble early saves money and risk. Common indicators include circuit breakers that trip frequently or fuses that blow repeatedly, scorch marks or a burning smell near the panel, warm or discolored panel walls, buzzing noises, or a panel cover that feels hot to the touch. If you notice any of these, consult safety guidelines and avoid prodding live components. FuseBoxCheck’s guidance highlights that labeling and documenting trips helps you spot patterns, such as a single circuit repeatedly failing under a specific load. In a typical home, addressing these signs promptly can prevent more serious failures and electrical fires, especially in older wiring that may not meet current safety standards.
Fuse box basics: fuses vs breakers, labeling, and ratings
Fuses are sacrificial devices that blow when overloaded, cutting power to a circuit. Breakers perform the same function but reset after a trip. Understanding the panel layout—where the main disconnect sits, which breakers or fuses protect which circuits, and the rating printed on each device—helps you diagnose problems more precisely. Proper labeling makes future inspections faster and safer. FuseBoxCheck analysis indicates that well-labeled panels and correctly rated devices improve DIY outcomes and reduce risk during maintenance. If your panel uses fuses, you’ll need accurate replacement fuses; if it uses breakers, ensure replacements match the panel’s amperage rating.
Planning a safe DIY inspection: prerequisites and safety
Before touching any panel, prepare a safe workspace: dry hands, dry floor, and clear surroundings. Gather the right tools and review manufacturer labeling. Establish a plan: list circuits, note which loads are essential, and know the main disconnect location. A dedicated, dry work area reduces slip or shock risk. FuseBoxCheck emphasizes safety culture: never bypass safety steps or work alone if you’re unsure. If you encounter signs of damage, corrosion, or heat, stop immediately and seek professional help.
Common mistakes and how to avoid them
DIYers often rush to reset a breaker or replace a fuse without verifying the cause of the trip. This can hide underlying issues and allow recurrent hazards to persist. Never work on a live panel; always de-energize first and test for voltage. Keeping a current panel directory helps prevent guessing about what loads influence a trip. Another mistake is using wrong replacement parts; always match the device’s amperage and type to the panel’s specification.
Testing and troubleshooting fundamentals
A cautious approach to testing uses a non-contact voltage tester and a digital multimeter to verify de-energization and measure loads. Start by turning off the main breaker, then re-check for any live parts with a tester. Inspect wire connections visually for looseness, discoloration, or signs of overheating. When testing load circuits, avoid pulling too much current from a single outlet or branch to prevent nuisance trips. Maintain documentation of results for future reference, which helps in planning upgrades or professional assessments.
When to upgrade or replace a fuse box and professional help
Older fuse boxes or panels with multiple signs of wear may not meet modern safety standards. If you notice frequent warmth, damaged insulation, corroded terminals, buzzing sounds, or degraded labeling, consider upgrading. Replacement may involve upgrading to a modern circuit breaker panel or upgrading service capacity to meet current electrical demand. In any case, a licensed electrician should perform the upgrade or service, particularly when wiring methods or service entrance conductors appear outdated. FuseBoxCheck recommends evaluating the cost-benefit of upgrading as part of long-term home safety planning.
Tools & Materials
- insulated screwdriver set (flat-head and Phillips)(Insulated to 1000V; ensure compatibility with panel screws)
- non-contact voltage tester(Verify non-energized state before touching terminals)
- digital multimeter(Use for measuring voltage and continuity)
- insulated work gloves(Protect hands from shocks; dry gloves only)
- safety glasses(Eye protection in case of arc flash or debris)
- flashlight or headlamp(Portable lighting for dim panels)
- panel directory or labeling journal(Keep track of circuits and loads)
- replacement fuses or breakers (matching panel rating)(Only if you determine a fuse/breaker is defective)
- clean dry workspace mat or rubber mat(Adds comfort and reduces static risk)
Steps
Estimated time: 60-90 minutes
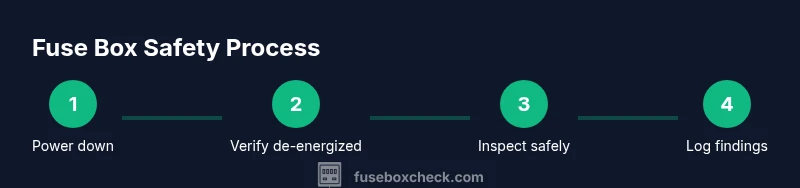
- 1
Power down and verify absence of voltage
Turn off the main breaker and, if applicable, switch off nearby branch breakers for the circuit you’ll inspect. Use a non-contact tester to confirm no voltage on exposed conductors. Keep your work area dry and avoid touching metal surfaces with bare hands.
Tip: Always double-check with the tester before touching any panel components. - 2
Remove panel cover safely and inspect labeling
Carefully loosen screws and lift the cover to reveal the interior. Check that circuit labels are legible; add or revise labeling as you go. Do not touch exposed conductors while the cover is removed.
Tip: If screws are damaged or cover shows signs of heat, stop work and consult a pro. - 3
Check for visible signs of damage or overheating
Look for burnt insulation, melted plastic, corrosion on terminals, and unusual smells. Take photos for documentation. If anything looks suspicious, do not proceed with further DIY steps.
Tip: Document findings before you reassemble; this helps with future maintenance or professional review. - 4
Test circuits with a multimeter under load
With the panel de-energized, set the multimeter to an appropriate voltage range and verify continuity where applicable. When safe to proceed, re-energize one circuit at a time and observe for abnormal readings or heat near connections.
Tip: Never exceed the device ratings and avoid testing while loads are actively connected if you’re unsure. - 5
Replace blown fuses or reset breakers safely
If a device is clearly defective (blown fuse or tripped breaker), replace with the same type and rating. Do not oversize or bypass safety devices. If you need to reset, do so only after identifying the reason for the trip.
Tip: Keep a log of replacements and trips to identify patterns and potential upgrades. - 6
Document findings and plan next steps
Record circuit-by-circuit status, take photos, and note any repairs needed. Decide whether to manage minor issues or contact a licensed electrician for a more thorough evaluation.
Tip: A well-kept panel directory speeds future maintenance and safety checks.
Your Questions Answered
What is the difference between a fuse box and a circuit breaker panel?
A fuse box uses replaceable fuses that burn out when overloaded; a circuit breaker panel uses resettable switches. Both types require correct ratings and safe handling, and servicing should follow manufacturer instructions and safety standards.
A fuse box uses fuses that burn out, while a breaker panel uses resettable switches. Both require proper ratings and safe handling.
Is it safe to reset a breaker after it trips?
Resetting a breaker is safe only after you’ve identified and deemed the cause of the trip. If it trips again, stop and investigate further; repeated trips suggest an underlying issue.
Only reset after you’ve identified the cause. If it trips again, stop and check for underlying issues.
How often should I inspect my fuse box?
Aim for a visual inspection annually and after major electrical work. Look for signs of wear, overheating, and labeling accuracy during each check.
Do a visual check once a year and after any major electrical work.
Can I replace a fuse box myself?
Minor maintenance can be safe if you are fully trained and follow safety precautions. For upgrades, service changes, or any uncertainty, hire a licensed electrician.
Only for basic tasks and with full safety knowledge. For upgrades, hire a professional.
What tools do I need to inspect a fuse box?
You’ll need a non-contact voltage tester, a digital multimeter, insulated screwdrivers, safety glasses, and a labeling journal to document circuits.
A tester, multimeter, insulated screwdrivers, glasses, and a labeling journal are essential.
What is an MTA fuse box, and is it different from a standard home panel?
MTA fuse box is a search term commonly used by homeowners; it isn’t a standardized electrical term. Treat it like any fuse box or panel and follow standard safety checks and labeling.
It's a common search term, not a formal electrical category. Treat it like a regular panel and follow safety steps.
Watch Video
Highlights
- Power down completely before inspection.
- Verify absence of voltage with a tester.
- Label circuits for future safety.
- Only replace parts that match panel ratings.
- Call a pro if you see damage or heat signs.